


H2O HD User Guide

Thank you for your purchase of H2O HD and welcome to our User Guide.
Here you will find useful tips to help you get started on your H2O HD and all the support that you will need.
Can’t wait to see what you’ll get with your H2O HD Advanced Steam Cleaning System order. Take a look at everything in the box.

Here's how your package will come

What's in the box
- 1 x H2O HD Advanced Steam Cleaning System
- 2 x Microfiber Floor Pads
- 1 x Angled Jet Nozzle
- 4 x Round Nylon Brush (Red, Black, Blue, Green)
- 1 x Garment Microfiber Pad
- 1 x Tri-plus Floor Pad
- 1 x Brass Brush (Black)
- 1 x Extension Hose
- 1 x Window Cleaning Tool With Squeegee
- 1 x Coral Pad For Window Cleaning Tool
- 1 x Coral Floor Pad For Mop Head
- 1 x H2O Descaler sachet

- Attach the H2O™ HD Mop Head, then insert and tighten the provided screw into the hole on the back (screwdriver not provided).
- Pull handle upwards to an upright and locked position.
- Insert the Power Supply Cord into the Cord Lock Slot located on the handle.
- Attach the Microfiber Cloth by placing the cloth under the Mop Head. Align fastening strips of the cloth with the gripping strips on the bottom of the Mop Head. Press to fit together.
- When using the H2O™ HD Steam Cleaner on carpeting or rugs: Place the Mop Head, with Microfiber Cloth in place, on top of the Carpet Glider as illustrated in Fig. 5. Do not attempt to use the H2O™ HD Steam Cleaner on carpeting or rugs without the Carpet Glider in place. Never use the Carpet Glider on surfaces that are prone to scratching.

- Ensure the H2O™ HD Steam Cleaner is unplugged. Remove the Water Tank by pressing the Water Tank Release Button and pulling the Water Tank from both sides (Fig. 1.).
- Turn the Water Tank Cap from the bottom of the Water Tank to “OPEN” and remove the Water Tank Cap (Fig. 2).
- Fill the Water Tank to the indicated tank capacity (450ml/15.2oz) (Fig. 3).
- Replace the Water Tank Cap and turn to “CLOSE” position. Make sure the Copper Cone inside the Water Tank is always submerged in water while operating the unit. Never put cleaning detergents into the Water Tank. Unless approved by the manufacturer, do not put any scented products in the Water Tank. The H2O™ HD Steam Cleaner uses tap water, but in areas with hard water use distilled water for better performance.
TURNING ON
- Plug the Power Cord into an electrical outlet. The Red Power Indicator light will come on, indicating power is on. At the same time the Blue Water Tank Light will come on.
- Wait for approximately 15 to 25 seconds for the Steam Power Level Indicator lights to flash, indicating that the unit is ready to use.
- Press the Steam Switch to begin emitting steam.
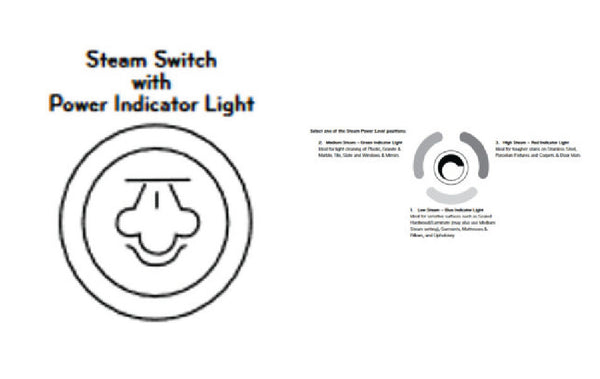
- Press the Steam Setting Button to your desired power level; for Low Steam, press the button once, two times forMedium Steam and three times for High Steam. Pressing the button again will bring you back to the Low Steam setting.
- To stop emitting steam, press and hold the Steam Switch for approximately 5 to 6 seconds. While holding the Steam Switch the Steam Power Level Indicator lights will flash. Steam will not stop emitting until the flashing stops and a beep noise is heard indicating it has been stopped.
- The unit is still on, and another press of the Steam Switch will start the emission of steam.
TURNING OFF
- To shut the power off to the unit, follow the instructions to turn the steam off (see above), and then unplug the Power Cord from the Electrical Outlet. When trying to stop Steam Emission, failure to hold the button long enough to stop flashing lights and hear the beep, will cause the unit will to continue steaming at the last steam setting.

- Remove the Power Supply Cord from the Cord Lock Slot.
- Detach the Hand-Held Steamer by pressing the Hand-Held Release Button and pulling out the Hand-Held Steamer unit (Fig. 1).
Your A-Z, everything you need to know about your H2O HD.
If you’re having trouble with your H2O HD, please visit our Customer Service portal at support.thane.ca to access your account and check on your status. For parts replacement, please visit warranty and parts for more information.
Alternatively, feel free to browse through the topics in our Frequently Asked Questions section.
Let us know your favourite things about the H2O HD or share your best tips & tricks:
WARRANTY REGISTRATION
This form is only for warranty registration. If you require any help or support, please visit our Customer Service Portal for assistance. Before submitting the form please ensure you have followed all the steps in the setup guide.